Objectives for this experiment
- Synthesize both metal and silicone films that contain features ranging from the molecular scale to the nanoscale to the microscope.
- Functionalize the surfaces of these films with a series of chemicals that behave differently from each other when in contact with water.
- Build and understand relationships between the structure of a surface, its chemical functionality, and the resulting interactions with the macroscopic world.
Introduction
Self-assembled monolayers on surfaces modify the physical, chemical, and even biological behavior of those surfaces. Just a few of the applications include chemical sensing, biosensors, drug delivery, light absorption for solar cells, and making waterproof coatings!
In this lab, students will learn the relationship between chemical groups on a surface, and how they interact when that surface comes in to contact with other materials. We use self-assembled monolayers that interact strongly or weakly with water to build these relationships.
There are a lot of self-assembled monolayer chemistries out there, but we use thiols on noble metals. Thiols are sulfur-containing organic molecules, and noble metals are metals that do not oxidize in air such as the jewelry metals gold, platinum, and silver. We silver in this lab because it’s comparatively inexpensive, and its very easy to make thin films of silver on glass using the Tollen’s test for sugars. In this case, we’re not “testing” for the presence of a sugar, rather we intentionally feed the mixture a sugar that results in silver plating out on to the glass slide of interest. From there we can make hydrophilic and hydrophobic thiol solutions, put them on the silvered glass slides, and play!
Making a silvered surface for thiol-based monolayers: Tollens’s Test for aldehydes.
While thiols make the best monolayers on gold (see the most excellent review Formation and Structure of Self-Assembled Monolayers by Abraham Ulman published in Chemical Reviews in 1996) thiols will also make less high-quality, but definitely good-enough monolayers on silver. Fortunately a more-than-century-old procedure exists for making silver films on glass: Tollens’s test for aldehydes. In this case we’re going to purposefully feed an aldehyde-containing sugar (glucose) to Tollens’s reagent for the purpose of generating a silver metal film on glass.
The reaction depends on the reduction of Ag+ ions from solution and as a result Tollens’s reagent must be prepared freshly the day of a lab. In our experience, preparing the reagent for students works well but they don’t always have enough to do. Starting in 2022, we modified the standard Tollens’s reagent to be able to make a silver film by directly dropping the component reagents of both Tollens’s reagent and glucose onto a glass slide. By using dropper bottles with the component reagents, all of the reagents can be made well in advance. Indeed, when we ran the camp in the summer of 2022, we used reagent mixtures that we had prepared in 2019. The only really important aspect is that silver nitrate solutions have to be stored in the dark, and glucose solutions will start to grow life in them if stored for a long period of time in non-sterile environments. So, okay, we had to make fresh glucose solutions, and the ethanolic thiol solutions had dried out, so those had to be remade. The KOH(aq), NH4OH(aq), and AgNO3(aq) solutions were all still good to go! If long periods elapse between running this lab, it’s best to dump, rinse, and dry the glucose dropper bottles and start from scratch each time.
Below are recipes for making four complete sets of reagents to be dispensed in 2 oz / 60 mL dropper bottles. A complete set requires six dropper bottles, so buying two dozen amber dropper bottles works great! (Amber is helpful for keeping light out of the silver nitrate solution.) Each can be distributed to four dropper bottles. We suggest making more of the silver nitrate solution as the procedure uses a larger volume of that solution than the others.
- 0.8 M KOH (2.2 g KOH in 50 mL water)
- 0.1 M silver nitrate (1.7 g AgNO3 in 100 mL water)
- ~7 M ammonia (25 mL concentrated 28–30% aqueous ammonium hydroxide diluted with 25 mL water)
- 0.5 M glucose or dextrose (4.50 g in 50 mL water) into many dropper bottles. Table sugar or sucrose does not work as the molecule must have a free aldehyde group!
Students can run the silver mirror reaction by:
- Clean a glass microscope slide in soapy water. Rinse and dry well.
- Place 8 drops of the silver nitrate solution on the glass slide.
- Add 1 drop of the ammonium hydroxide solution to the liquid. A precipitate will form. Gently wobble the glass slide to mix the solution to redissolve the precipitate.
- Add 4 drops of potassium hydroxide solution. A dark precipitate will form (silver oxide). Again, gently wobble the glass slide to mix the solution to redissolve the precipitate. It may not completely redissolve but that’s okay.
- Add 1–2 drops of the ammonium hydroxide solution if and only if the dark precipitate does not fully go away when wobbled in step 4.
- Add 4 drops of the glucose solution. Again wobble to mix, and let sit for at least one minute, or until a little bit of silvering appears around the liquid’s edge.
- Pour off excess liquid into a waste beaker (please collect all waste and do not put in the trash or down the sink!). Importantly, do not wipe or rinse the liquid off of the glass slide as it’s the thin film of liquid that remains that will produce the silvered surface.
- After a minute, the slide should show obvious signs of silvering. After 3–5 additional minutes the slide should be sufficiently silvered for subsequent reactions. The remaining liquid may be rinsed gently with water or alcohol. (We had 70% ethanol spray bottles around from the Covid of it all and those worked great.) Let the films dry in air without wiping as that may delaminate the silver from the glass.
If the silver film is splotchy, the most likely explanations are that the slide was insufficiently cleaned (the silver won’t stick to organic contaminants), the slide was likely insufficiently wobbled to mix the chemicals, or one waited an insufficient amount of time. If the film is splotchy or thin due to poor mixing, the process can be repeated on the same slide to build up a thicker film. If the slide was dirty, wipe everything off, reclean the side in fresh detergent with lots of rinsing in clean water, and try again.
See the time lapse video below for the result of this silver mirroring process on a glass slide. Don’t hesitate to contact Grimm if you have any questions!
Special thanks to Julia Martin for the video!
Making and Working With Thiol-based Self-Assembled Monolayers
The solutions can be made well in advance. If you’ve read all the way through to this point, you’d see that our solutions dried out between 2019 and 2022, but that’s more likely due to less-than-stellar sealing in the dropper bottles in which we had stored those solutions from 2019. You can make these well in advance and store until needed:
- A hydrophilic thiol such as 10 mM mercaptohexadecanoic acid (290 mg in 100 mL ethanol)
- A hydrophobic thiol such as 1 mM octadecanethiol (28 mg in 100 mL ethanol)
When dropped onto the silver-mirror surface, these thiols get to work right away. Thiols do not pack as perfectly on silver as they do on gold (see the Ulman paper above), so there is no need to chase perfection here. Thirty sections of exposure followed by rinsing works perfectly. As above, we had bottles of 70% ethanol in water, and those worked great.
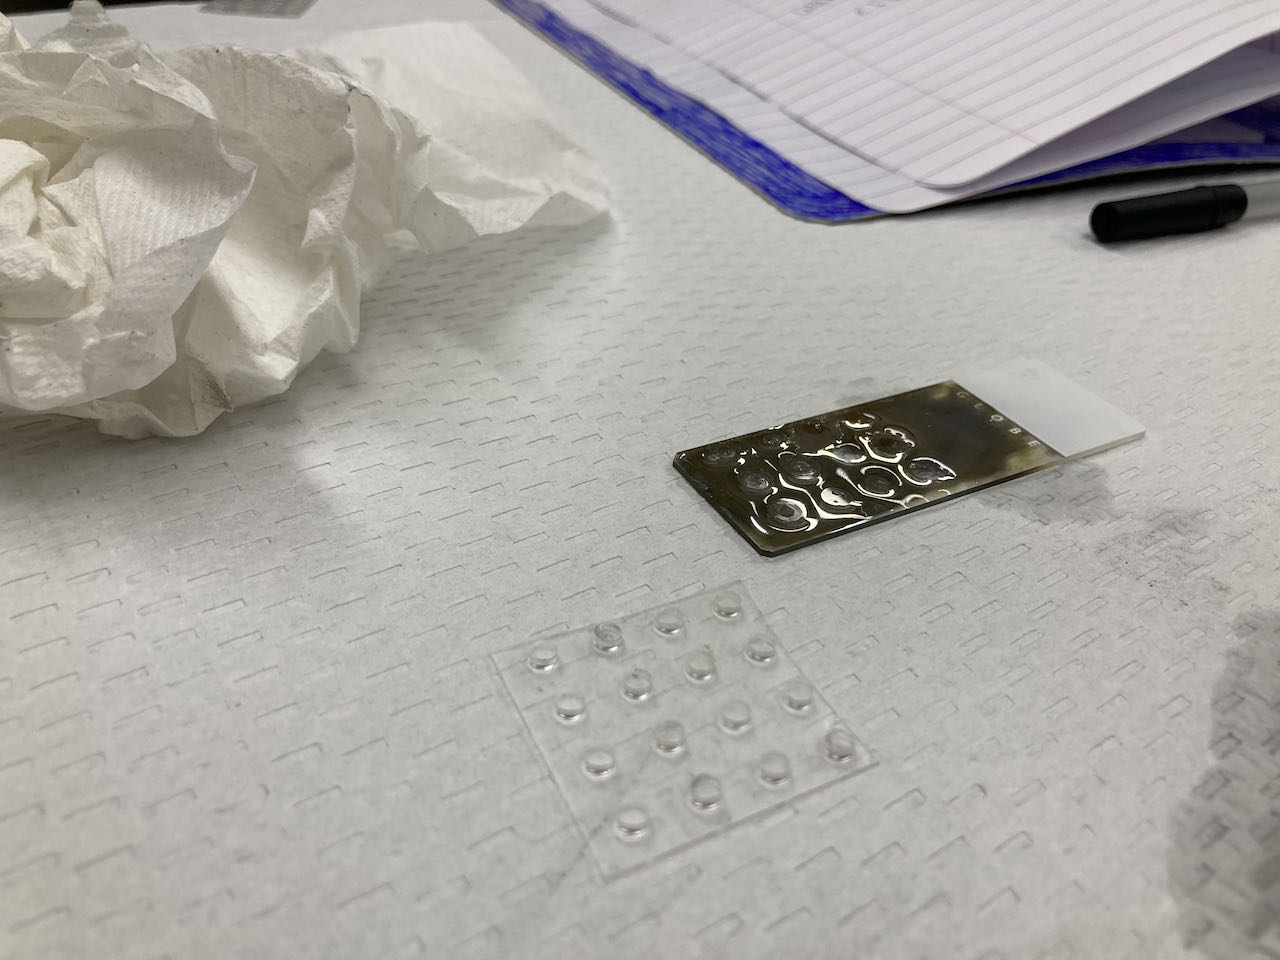
For the video below, Julia had prepared a silvered surface and then reacted the surface with two different thiols. This is tricky as unreacted surfaces will adsorb thiols readily from solution. In this case, she derivatized the end of the slide first, and made sure to rinse downward so that no thiol touched the middle of the slide as it was being rinsed off. After rinsing (without drying) she exposed the whole silver surface to the other thiol, waited 30 s, and rinsed. In this video she has put one droplet on each of two differently terminated monolayer surfaces. Can you tell which one is which?
Optional: producing textured PDMS surfaces for lithographically pattering hydrophobic and hydrophilic regions of a self-assembled monolayer
The video of droplets on adjacent SAMs might simultaneously indicate that it’s both really cool and really challenging to build a patterned surface of thiol-based SAMs… at least when one is making the SAMs by drop-casting thiols from low-surface-tension alcohol solutions that spread out on metal surfaces.
One workaround for drop casting is to do lithographic patterning of the SAMs. This is pretty straightforward to do if you can use a stamp of some sort to deposit the thiol in specific places on the metal surface. In Launch, we made stamps by pouring poly(dimethyl siloxane) or PDMS over a Lego baseplate to make a repeating pattern. PDMS cures at room temperature in ~3 days or so (Lego baseplates weren’t exactly designed with high temperature curing of polymers in mind) and the pattern is unmistakable. We first glued down some wooden splints to hold the PDMS in place, put down a large amount of PDMS, and let it cure for about a week. If you haven’t worked with PDMS before, it’s a little costy, but a tub has a very long shelf life and there are lots of instructions out there for working with it. In our experience the degassing step is absolutely critical for getting a really good replica of its mold, but this can be skipped at a small loss in the fidelity of the resulting polymer relative to its mold if one does not have access to vacuum equipment.
Why do we use PDMS? First is getting the pattern to template, but the other important aspect of it is that PDMS absorbs alcohols. This means that when we soak a PDMS template in a thiol-containing alcohol solution, the PDMS will also absorb that thiol and placing the PDMS on the silver surface will yield a pattern of thiol on the surface based on where the PDMS was touching. This is an incredibly simple yet fun example of lithographic patterning!
In addition to the Lego baseplate molds, we poured PDMS over various grits of sandpaper to make superhydrophobic surfaces. On such surfaces, droplets have an extremely high contact angle with nearly zero wetting due to both chemical hydrophobicity (think hydrocarbons or fluorocarbons) as well as physical texturing. Lotus leaves accomplish both as one can see from an Interplace image search for scanning-electron micrographs of lotus leaves, but making PDMS imprints of sandpaper works really well too!
- PDMS elastomer and initiator (Sylgard 184)
- Disposable weighing boat (it’s really messy to clean up!)
- Disposable BD-style syringes if measuring small amounts, or pouring directly into a weighing boat if using larger volumes
- Various grits of sandpaper (we found that 240-grit to 400-grit works great!)
- Glass petri dishes (used for holding sand paper and setting on a hot plate, so plastic dishes won’t work unless the PDMS will be cured at room temperature)
- Vacuum desiccator and vacuum pump (for the recommended but definitely optional degassing of the PDMS)
- Hot (~100 °C) hotplate (for curing the PDMS on the sandpaper in a time that is significantly faster than its three-days-at-room-temperature cure time)
Patterning chemical functionality with textured PDMS films and stamps
- Place ~1 cm2 pieces of sandpaper from several different grits together in a petri dish, making sure the pieces do not overlap. This will become the template for the PDMS.
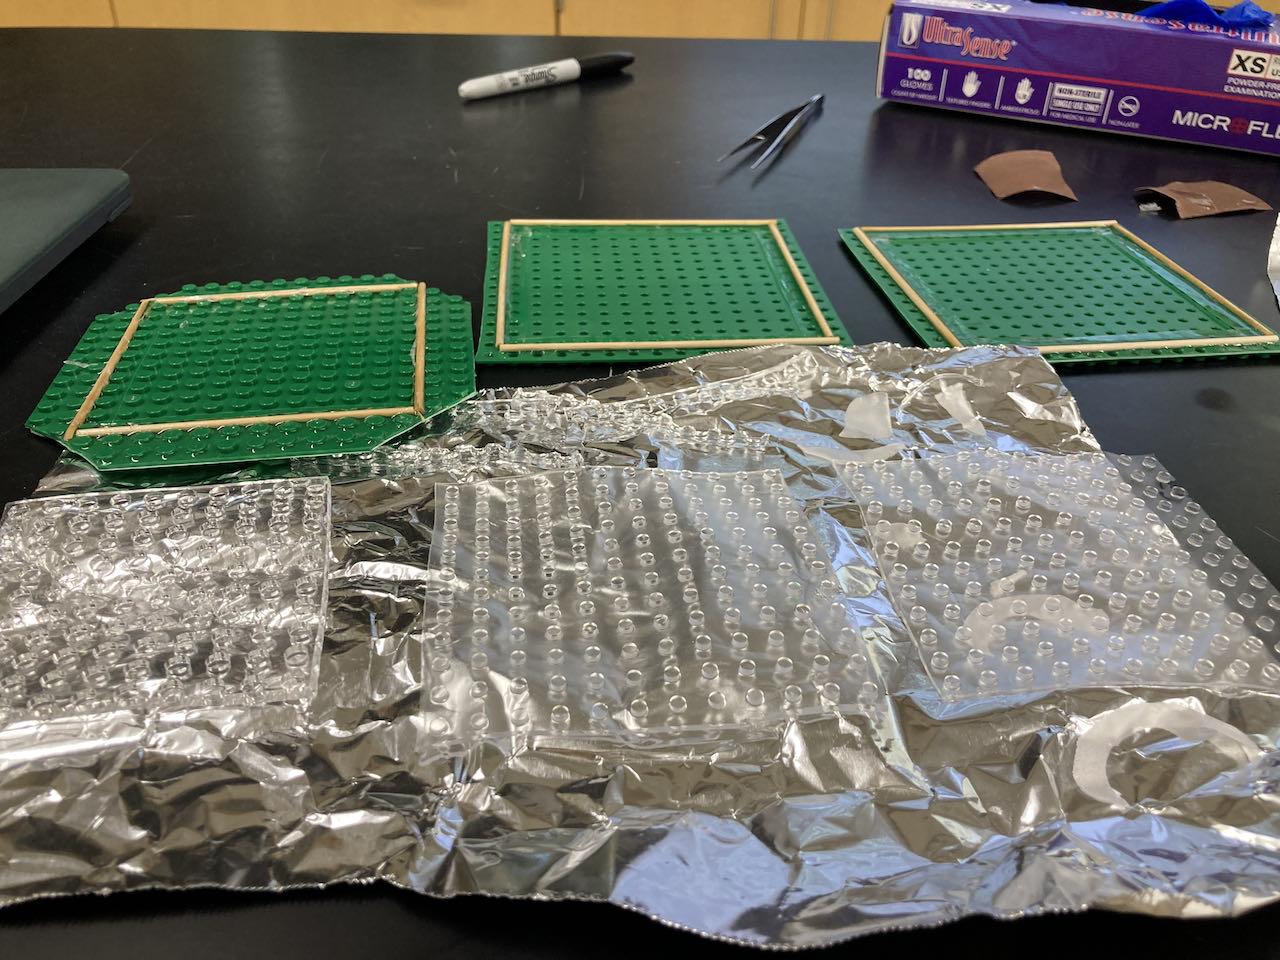
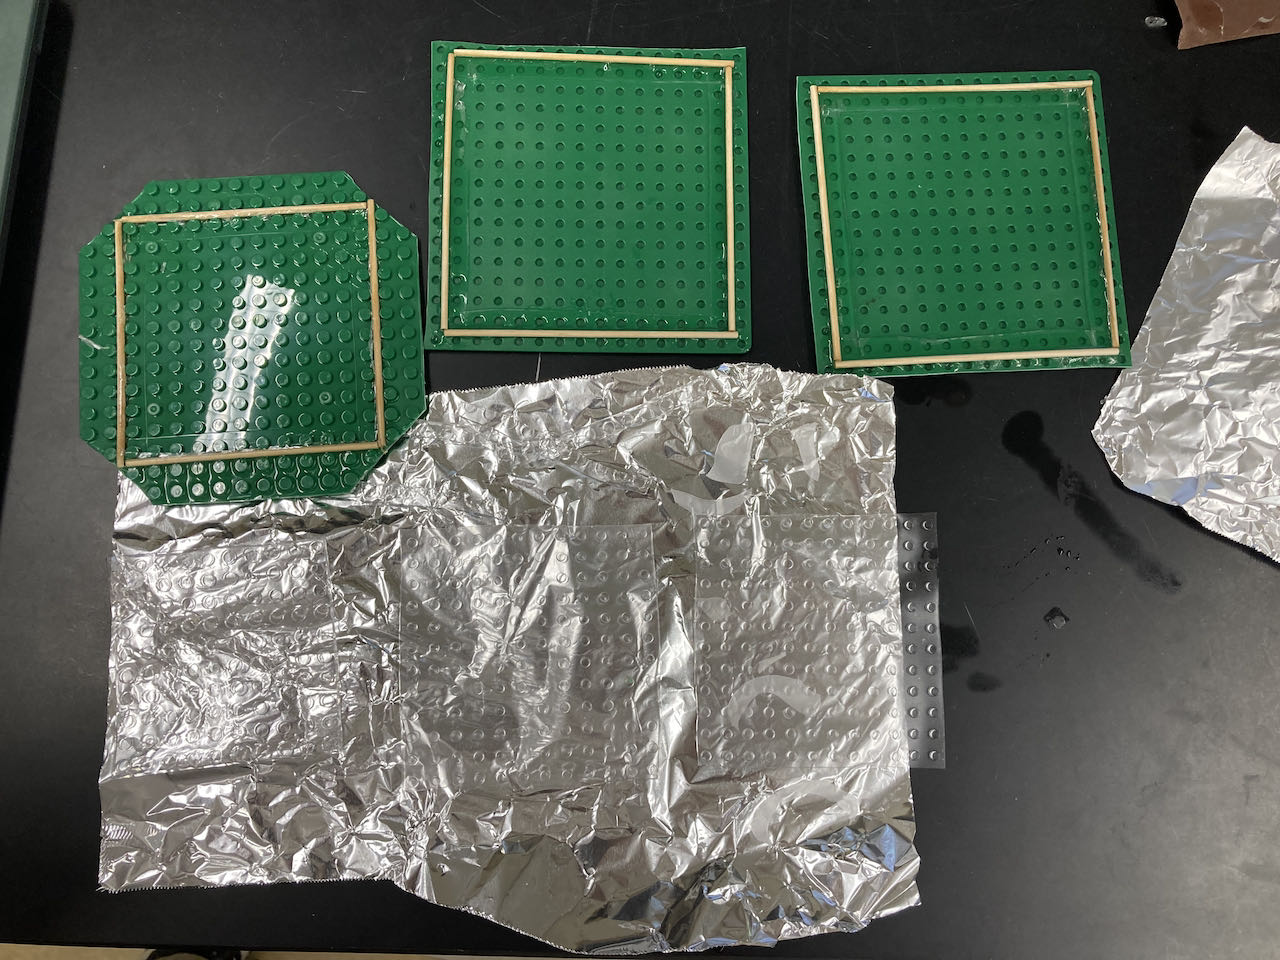
- If you’re using a Lego baseplate, make some walls for the PDMS by gluing long sticks (tongue depressors, disposable wooden skewers, etc.) together as in the photos below.
- Into a disposable weigh boat, measure out a few grams of the PDMS elastomer, and suffient quantities of the curing agent to make a 10 to 1 mixture by weight of the elastomer to the curing agent. The elastomer is very sticky and very messy, so be patient!
- With a disposable toothpick, liberally mix the elastomer and curing agent together. Note that several bubbles and air pockets will form in the mixture.
- With a toothpick, spread a film of the elastomer mixture over its mold (i.e. a piece of sandpaper, or a Lego baseplate, or something else). The next step (vacuum pumping to remove air bubbles) will be more challenging if the elastomer gets out of its desired location.
- (Note: your instructor will help you with this!) Place the petri dish with the elastomer-coated sandpaper samples or the Lego baseplate in to a vacuum desiccator that is connected to a vacuum roughing pump. Gently open the valve between the desiccator and the vacuum pump. As the pressure in the desiccator drops, air pockets and dissolved gases in the elastomer will bubble to the surface and be similarly pumped away. If the pressure drops too quickly, the action of the bubbles may be unpredictable, so be patient!
- With the elastomer sufficiently degased (no more bubbles appearing under vacuum), close the valve to the pump and gently open the desiccator to air. Place the petri dishes on to a hot plate for curing the sandpaper at 100 °C. The Sylgard 184 that we use will cure in about 2–3 days at room temperature, 45 minutes at 100 °C, 20 minutes at 125 °C, and 10 minutes at 150 °C.
- When sufficiently cured and cooled, lift the PDMS off of the sandpaper samples and place face up in to a cleaned petri dish. As with the thiol-functionalized silver mirrors, explore the contact angle of water droplets on your PDMS films. Characterize the behavior and relationships between sandpaper grit, and the resulting droplet contact angle. Use a camera to capture any images that may assist your analysis.
- If pulling PDMS out of a Lego baseplate mold, the PDMS may need to be cut around the edges to detach from whatever material is holding it in (wooden skewers?). Drop many droplets of thiol-containing alcohol solution onto the PDMS or submerge the PDMS in thiol-containing alcohol. When ready to stamp, remove excess liquid from the outside of the PDMS and set gently on a silvered surface. After 30-60 second, lift the PDMS off and let the silvered surface dry (we don’t want to rinse at this point as thiols could go where the PDMS wasn’t touching). With a dropper, deposit the other thiol in the locations where the PDMS wasn’t touching and rinse the whole surface after 30 seconds.
Shown below are three PDMS films cast from both the obverse and reverse sides of a Lego baseplate. Casting on the reverse side yields positive PDMS features. A student in Launch used a positive PDMS stamp to template hydrophobic SAM islands that were then surrounded by a hydrophilic sea. Water clearly avoided the hydrophobic islands!
Slides for SAM Presentation and Discussions


 Research
 Energy
 People